Friday, May 30, 2008

Subscriptions in UCMA part 2: Self

In Part 1 we have seen how we can subcribe to Roaming Contacts in this part we will take a look at Self subscription.

You may ask why do we want to subscribe to our self? actually Self subscription returns some important information. Which categories do we have set up. Which containers do we have and the membership of those containers. And who is subscribed to me. The last one can be very handy. For instance we have created a bot, and we want to tell everybody who is using it that it will be down for maintenance or that new functionality has been added.

This one is a little more difficult then the one we have seen in part 1. We actually have to send a message during the subscription.

The class implementing the ISipSubscriptionProcessor interface:

public class RoamingSelfSubscription : ISipSubscriptionProcessor
{
void ISipSubscriptionProcessor.GetExtensionHeaders(SipSubscription.RequestType requestType, out IEnumerable<SignalingHeader> extensionHeaders)
{
extensionHeaders = null;
}
void ISipSubscriptionProcessor.GetMessageBody(SipSubscription.RequestType requestType, out ContentType contentType, out byte[] messageBody)
{
contentType = null;
messageBody = new Byte[0];
if (requestType == SipSubscription.RequestType.Subscribe ||
requestType == SipSubscription.RequestType.Refresh)
{
contentType = new ContentType("application/vnd-microsoft-roaming-self+xml");
StringWriter sw = new StringWriter(new StringBuilder(128), CultureInfo.InvariantCulture);
XmlTextWriter writer = new XmlTextWriter(sw);
writer.WriteStartElement("roamingList");
writer.WriteAttributeString("xmlns", "http://schemas.microsoft.com/2006/09/sip/roaming-self");
this.AddRoamingType(writer, "categories");
this.AddRoamingType(writer, "containers");
this.AddRoamingType(writer, "subscribers");
writer.WriteEndElement();
sw.Close();
writer.Close();
messageBody = System.Text.Encoding.UTF8.GetBytes(sw.ToString());
}
}

void ISipSubscriptionProcessor.ProcessErrorResponse(SipResponseData message)
{
// TODO
}

void ISipSubscriptionProcessor.SubscriptionStateChanged(SubscriptionStateChangedEventArgs e)
{
//TODO
}
private void AddRoamingType(XmlTextWriter writer, string roamingType)
{
writer.WriteStartElement("roaming");
writer.WriteAttributeString("type", roamingType);
writer.WriteEndElement();
}
public void ProcessNotification(SipMessageData message)
{
String s = message.GetMessageBodyString();
//TODO
}
}


Let's Subscribe, the even package name is "vnd-microsoft-roaming-self".


public void SubscribeRoamingSelf()
{
RoamingSelfSubscription mycgSubscription = new RoamingSelfSubscription();
SipEndpoint myEndpoint = _endPoint;
RealTimeAddress cgAddress = new RealTimeAddress(_endPoint.Uri);
SipSubscription mySubScription = new SipSubscription(myEndpoint, cgAddress, "vnd-microsoft-roaming-self", mycgSubscription);
mySubScription.BeginSubscribe(SubscribeRoamingSelfCallback, mySubScription);

}
private void SubscribeRoamingSelfCallback(IAsyncResult asyncResult)
{
SipSubscription mySubscription = asyncResult.AsyncState as SipSubscription;
try
{
mySubscription.EndSubscribe(asyncResult);
}
catch (PublishSubscribeException)
{
//TODO
}

catch (RealTimeException)
{
//TODO
}
}


For more information/questions/remarks please contact me sip:marc.wetters@e-office.com
Subscriptions in UCMA Part 1: Roaming Contacts

Looking at the UCMA 1.0 SDK stated that it is possible to use subscriptions. The only thing that is missing is how to implement them? What do we need to send? What do we get back?

For this information you have to dig deep into the protocols.
Recently Microsoft published preliminary versions of these protocols. You can find them here: Office Protocol Documents. It's almost 90 Mb in PDF documents :-(.

For me the most important subscriptions are at the moment: "Roaming Contacts", "Self", and the most important one "presence".

This part I'll focus on Roaming Contacts. This subscription returns all the groups and contacts you are subscribed to.

First we have to create a class that implements the ISipSubscriptionProcessor. Next to setting the message and the SignalingHeaders, the main thing for this class is handling the notifications.

public class RoamingContactsSubscription : ISipSubscriptionProcessor
{
void ISipSubscriptionProcessor.GetExtensionHeaders(SipSubscription.RequestType requestType, out IEnumerable<SignalingHeader> extensionHeaders)
{
extensionHeaders = null;
}

void ISipSubscriptionProcessor.GetMessageBody(SipSubscription.RequestType requestType, out ContentType contentType, out byte[] messageBody)
{
contentType = null;
messageBody = new Byte[0];
}

void ISipSubscriptionProcessor.ProcessErrorResponse(SipResponseData message)
{
//Not implemented
}

void ISipSubscriptionProcessor.SubscriptionStateChanged(SubscriptionStateChangedEventArgs e)
{
//Not implemented
}
public void ProcessNotification(SipMessageData message)
{
String s = message.GetMessageBodyString();
ContentType contentType = message.ContentType;

// TODO; Do somthing with the notification message!!!
}

}


Next we have to subscribe. For this code I already registered an endpoint. The event package name is : "vnd-microsoft-roaming-contacts"


public void SubscribeRoamingContacts()
{
RoamingContactsSubscription myRCSubscription = new RoamingContactsSubscription();
SipEndpoint myEndpoint = _endPoint;
RealTimeAddress RCAddress = new RealTimeAddress(_endPoint.Uri);
SipSubscription mySubScription = new SipSubscription(myEndpoint, RCAddress, "vnd-microsoft-roaming-contacts", myRCSubscription);
mySubScription.BeginSubscribe(SubscribeRoamingContactsCallback, mySubScription);
}


private void SubscribeRoamingSelfCallback(IAsyncResult asyncResult)
{
SipSubscription mySubscription = asyncResult.AsyncState as SipSubscription;
try
{
mySubscription.EndSubscribe(asyncResult);
}
catch (PublishSubscribeException)
{
//TODO
}

catch (RealTimeException)
{
//TODO
}
}


That is actually all. Here is a sample of the Notification message:


<contactList deltaNum="4">
<group id="1" name="~" externalURI="" />
<contact uri="Joachim.Farla@e-office.com" name="" groups="1" subscribed="true" externalURI="" />
<contact uri="Marc.Wetters@e-office.com" name="" groups="1" subscribed="true" externalURI="" />
</contactList>


Next Part will be self subscribe.


For more information/questions/remarks please contact me sip:marc.wetters@e-office.com

Thursday, May 29, 2008

Getting and setting presence using UCMA

After publishing the first 2 articles about getting and setting presence using UCMA, Paolo Tuninetto came up with a scenario in which it didn't quite behaved the way I expected it to be.

If you did set the presence of your application it did show up online in the OC Clients. If you were getting the presence of some one using the OC client it got the correct presence back. That was the scenario I used and tested.

But if you set the presence using one application and getting it with an other the way I described it. It didn't work.  Still in the OC client the correct presence was set.

So what was going on? Actually the problem was in both the setting and getting the presence. Getting the presence the way I described uses the old (legacy) way of getting presence. And we set the presence using the new (enhanced presence) way.

The solution was either getting the enhanced presence or  setting the legacy presence. Actually it's better to do both. The way I was getting the presence only supports the old way. The best way for getting presence is actually subscribing to presence, which I will address in an other article.

So we had to set the legacy presence also.

This is almost the same as publishing the enhanced presence, except that the category is different.

string PresenceBlobLegacy = "<publish xmlns=\"http://schemas.microsoft.com/2006/09/sip/rich-presence\"><publications uri=\"{0}\"><publication categoryName=\"legacyInterop\" instance=\"0\" container=\"{1}\" version=\"{2}\" expireType=\"user\"><legacyInterop availability=\"3500\" /></publication></publications></publish>";


For more information contact sip:marc.wetters@e-office.com

What's coming up...

I've been really busy with a lot of questions and issues regarding to UC development. Here is a short overview of what I've been working on and what you can expect from me the next few weeks.

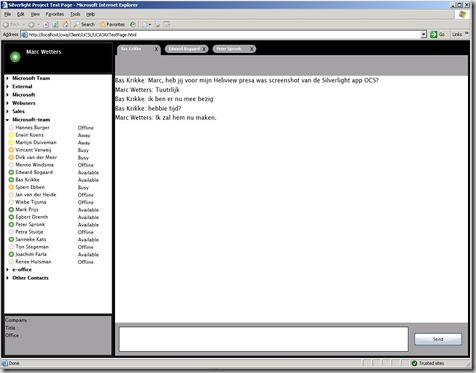
CWA and Silverlight 2 beta 1.

I'm still working on this one here is a screenshot of the current application:

SnipImage

Next part of this series will show you how to handle presence events.


UCMA

After publishing the articles about how to get and how to set presence, I got a series of questions and issues. To solve these I had to take a deep dive into the presence and SIP protocols. Microsoft recently published preliminary versions of these protocols.

Here is a list of the things I worked on:

  1. Getting and Setting presence(update article coming soon)
  2. Subscriptions
    1. self(Categories, Containers, Subscribers)
    2. roaming contacts (groups and contacts)
    3. presence (in fact there are 3 ways how you can implement presence subscriptions).
  3. ContainerMembership


For more information contact sip:marc.wetters@e-office.com

Friday, May 23, 2008

Using UCMA to create a custom routing bot!

Using UCMA to create a custom routing bot!

Scenario (case):
A service/help desk wanted to expand their services using OCS as an extra communication channel. The big question in this case is how can we use a single point of entry for the employees who want to connect to the service desk? How can we show that the service desk is online? How do we make sure that an available service desk employee gets the question/incoming messages? How can we maintain the pool of service desk employees?

Solution:
Create a custom application using UCMA . This application registers itself as THE service desk. If one of the employees of the service desk is online/available the service desk is online/available.  If none of the employees is online the application shows itself as offline. If somebody sends a message to the service desk the message will be routed to the next available service desk employee. We wanted this to use for text messages but also for incoming video and audio calls.

Example application:
For demo purposes we created a Windows application.
In this case, if at least one of the 3 users is online/available the application is online. The colors show the availability of the different users.image
If we send a message to the application (in this case TUser4), we are routed to the next available user.
The logic to which person to route is build in the application.

 image

The biggest technical problems we encountered:

1.    How can set the presence of the application.
2.    How can we get the status of the different users in the “pool”.
3.    Even better how can subscribe to the presence of the users in the “pool”.
4.    How can we refer the incoming session to a different user.

The solution for these problems:

1.    You can set the presence using the UCMA api by creating a presence container(this is done by a SipServiceRequest) , after the presence container is created you can publish the presence ( also a SipServiceRequest) .Setting Pressence using UCMA

2.    If you want to get the status of a user in the “pool” you can send a SipServiceRequest to the user from which you want to know the presence. See also Getting presence using UCMA

3.    Subscribing to presence was really a difficult one. In this case we used a SipSubscription and a class implementing the ISipSubscriptionProcessor interface.

4.    At the moment you cannot refer a SignalingSession to a different user(OC client doesn’t support it). So there are two scenario’s. Use the application to set up a session from the application and proxy Instant messages back and forth through the application. This only works for instant message and not for audio and video calls. So the other solution is that to use TerminateWithRedirection on the incoming  SignalingSession this also works with audio and video calls.

At this moment I cannot get deeper into the exact details of the SipServiceRequest , SipSubscription , ISipSubscriptionProcessor we used in this application.

Microsoft says that it is not possible using the UCMA to get the presence or subscribe to presence. But actually it is, if you know the exact protocols to use!!!!

For more information contact sip:marc.wetters@e-office.com

Setting Presence using the UCMA

Using the UCMA there are actually 2 ways in setting the presence.

The first one found in the Microsoft samples is as an automaton. This means that you tell the OCS server that your presence won't change. This is usefull for creating bots. They are normally always online.

But what is your application isn't always online. What if you only want your bot to be online during business hours.

So I will focus on setting the presence not as an automaton.

First you have to register your end-point.

Let's define some constants. The real change here is "expireType". which is set to user and not endpoint!

Constansts

public const string CategoryPublicationContentType = "application/msrtc-category-publish+xml";
public const string ContainerMemberContentType = "application/msrtc-setcontainermembers+xml";

public const string PresenceBlobUser = "<publish xmlns=\"http://schemas.microsoft.com/2006/09/sip/rich-presence\"><publications uri=\"{0}\"><publication categoryName=\"state\" instance=\"0\" container=\"{1}\" version=\"{2}\" expireType=\"user\"><state xmlns=\"http://schemas.microsoft.com/2006/09/sip/state\" xmlns:xsi=\"http://www.w3.org/2001/XMLSchema-instance\" xsi:type=\"aggregateState\"><availability>{3}</availability></state></publication></publications></publish>";

public const string ContainerMembership = "<setContainerMembers xmlns=\"http://schemas.microsoft.com/2006/09/sip/container-management\"><container id=\"{0}\" version=\"{1}\"><member action=\"add\" type=\"sameEnterprise\" /></container></setContainerMembers>";

public const int PresenceContainer = 7000;

public enum PresenceState
    {
        Online = 3500,
        DoNotDisturb = 9500,
        Offline = 18500
    }


Next is setting up the presence container.

public void SetupPresenceContainer()
        {
            SipEndpoint endpoint = _endPoint;

            if (endpoint != null)
            {
                ContentType contentType = new ContentType(Constants.ContainerMemberContentType);

                string ContainerACL = String.Format(Constants.ContainerMembership, Constants.PresenceContainer, _presenceContainerVersion);

                byte[] body = Encoding.UTF8.GetBytes(ContainerACL);
                SipServiceRequest request = new SipServiceRequest(endpoint, contentType, body);

                request.BeginService(SetupContainerCallback, request);
            }
        }

private void SetupContainerCallback(IAsyncResult ar)
        {
            SipServiceRequest request = ar.AsyncState as SipServiceRequest;
            try
            {
                request.EndService(ar);
            }
            catch (FailureResponseException e)
            {
                string s = e.ResponseData.GetMessageBodyString();
                s.IndexOf("curVersion");
                string s2 = s.Substring(s.IndexOf("curVersion") + 12, 10);
                string[] array = { "\"" };
                string[] s3 = s2.Split(array, 2, StringSplitOptions.None);
                _presenceContainerVersion = int.Parse(s3[0]);
                SetupPresenceContainer();
            }
            catch (RealTimeException )
            {
            }
        }


Now it's time to set our Presence

public void PublishPresenceState(PresenceState availability)
        {
             if (_endPoint != null)
            {
                int availabilityValue = (int)availability;
                ContentType contentType = new ContentType(Constants.CategoryPublicationContentType);
                string presenceBlob = String.Format(Constants.PresenceBlobUser, ConnectionSettings.Uri, Constants.PresenceContainer, _presenceVersion, availabilityValue);
                byte[] body = Encoding.UTF8.GetBytes(presenceBlob);
                SipServiceRequest request = new SipServiceRequest(_endPoint, contentType, body);
                request.BeginService(PublishPresenceStateCallback, request);
            }
        }


private void PublishPresenceStateCallback(IAsyncResult ar)
        {
            SipServiceRequest request = ar.AsyncState as SipServiceRequest;

            try
            {
                request.EndService(ar);
            }
            catch (PublishSubscribeException e)
            {
                // This exception is most likely due to a version conflict. Parsing the Response body
                // to retrieve the current version, and publish again.
                string s = e.ResponseData.GetMessageBodyString();
                s.IndexOf("curVersion");
                string s2 = s.Substring(s.IndexOf("curVersion") + 12, 10);
                string[] array = { "\"" };
                string[] s3 = s2.Split(array, 2, StringSplitOptions.None);
                _presenceVersion = int.Parse(s3[0]);
                PublishPresenceState(_presence);
            }

            catch (RealTimeException)
            {
             }
        }


For more information contact sip:marc.wetters@e-office.com

Monday, May 19, 2008

Unified Communications (UC) Platform Developer Metro Training

Last week I followed this 2 day training in the Netherlands. It really gives developers a good overview where to start. If you want to start developing on the UC platform, I really recommend that you follow that training. I have been working with some of the SDKs and APIs a little longer and still learned quite a bit.

Main topics are:

  • Unified Communications: Behind the Scenes with OCS 2007, OC 2007 and Exchange 2007
  • Driving Contextual Collaboration with OC 2007
  • Building Contextual Collaboration Clients for the Web using the UC AJAX SDK
  • Building Asynchronous Contextual Collaboration with Exchange Web Services
  • Business Process Communication with the UCMA
  • Anywhere Information Access with OCS 2007 Speech Server

Any questions/ comments please feel free to contact me.
Sip:Marc.Wetters@e-office.com or email:Marc.Wetters@e-office.com

Getting Presence using the UCMA

Yes, it can be done, but I have to warn. It is not officially supported by Microsoft.
Here is a code sample how to do it using a SipServiceRequest. Note that you must have created an endpoint before you can use this code. I used a RealTimeClientConnectionManager to create the endpoint.

The request:

image

The callback, which handles the response data.

image

Any questions/ comments please feel free to contact us.
Sip:Marc.Wetters@e-office.com or email:Marc.Wetters@e-office.com or Sip:Joachim.Farla@e-office.com or email:Joachim.Farla@e-office.com.

Developing middle tier UC applications, where to start?

This is not an easy question. There are multiple SDK’s and API’s, which one should I use in which scenario?
I have been in discussion with some UC developers and people from Microsoft about some of the issues I was facing, and what the possible solutions are.

The first API that comes to my mind is the UCMA (Unified Communications Managed API). The second would be the UC AJAX SDK. Then we have the UCCA (Unified Communications Client API) and the OC (Office Communicator SDK).
The UCCA and OC SDK are client oriented. The UCCA is the one to create a new client if you don’t want to use the Office Communicator client. The OC SDK is to interact with the Office Communicator client. So for creating middle tier UC applications these are not really suited.
I have been in discussion with some UC developers and people from Microsoft about some
Let’s try and start with some scenario’s.

Broadcasting messages

This should be an easy answer. Let us use the UCMA. The UCMA is really a good choice, it’s intended to for such a scenario. It can handle high volumes and is scalable. However, it is not the only possible API to use. What about the UC AJAX SDK, can it do the trick? Sure it can, as long as you stick to text messages. Can it handle high volumes, and is it scalable? Does it perform well? In fact it does. I do not have exact figures, but I am really surprised of the performance. And the UC AJAX SDK is much easier to understand then the UCMA. What are the drawbacks of using the UC AJAX SDK? Only two come to my mind: you can only use text message and you need a CWA (Communicator Web Access) server.

Bots

First one again the UCMA. But in fact the UC AJAX SDK can be used as well. In this case, the reaction time of the UC AJAX solution reacts a little slower then the UCMA solution. This is caused by the polling mechanism for getting events. The advantage of the UCMA is that you can set the presence as an automaton(Always online). Normally there is a limit of 200 subscriptions. Publishing your presence as an automaton doesn’t have that limitation.
You can use the System.Speech in .NET 3.0 to handle more complex grammar recognition.

Bots that needs presence


Now we get to the real discussion. Can we use the UCMA? Officially getting presence and subscribing to presence is not supported in the UCMA!!!
So what are the alternatives? You could use the UCMA and use UC AJAX SDK for getting presence information. This is a good combination, and you could use the advantages of both. If you only need text messages, the UC AJAX SDK is a good choice.

UCMA and presence!!!

Presence in Office Communicator server is done with sip requests and sip subscriptions. I have seen a lot of questions on the net if it is possible to get presence using the UCMA. Everybody at Microsoft I have spoken to or reactions that have been posted to these questions stated that presence information in UCMA is not possible. My first reaction was why is it not possible? The UCMA supports sip requests and sip subscriptions. At that time, I took a deep dive in the protocols and tried to find out if it was really not possible. Can you make the correct sip request or sip subscription in UCMA to get presence? Using the Office Communicator Server Resource kit I found out that actually you can.
I presented my findings to some people at Microsoft. They were surprised. In fact you can do it but it is officially not supported. For me the big question was why is it not supported. Actually the answer is quite simple. The correct protocols for presence are not public. The only applications that use those specific protocols are all Microsoft applications. For future versions these protocols can be subject to change. So the application you create may not work anymore with future versions or updates.
Will it keep me from using these protocols und keep me from using UCMA for presence? No it will not. And the main reason for that is that the Office communicator client, the CWA server, Office Communicator server, the UCCA all use the same protocol. If Microsoft will change that protocol none of these applications will be compatible anymore with the new version.

Any questions/ comments please feel free to contact us.
Sip:Marc.Wetters@e-office.com or email:Marc.Wetters@e-office.com or Sip:Joachim.Farla@e-office.com or email:Joachim.Farla@e-office.com.

Creating a CWA client with Silverlight 2 beta 1 (part 5)

In Part 4 we have seen how to get events from the cwa-server. But we still have to schedule this. The pollWaitTime tells us when we can get our next events.

You could use the System.Windows.Threading.DispatcherTimer  but this ticks with a regular interval and as our interval is dynamic I went for a stroryboard in Silverlight.

Creating the timer
Just add a story board to XAML in your application/usercontrol.

image

In the code file add the code that handles the TimerCompleted Event. In this Method we set the timer duration stop the timer, get our events and start the timer again.

image


We still have to start our timer manually the first time. We can only do this only after we have signed in. So from our userAgent we raise our event that we have successfully signed in. Then start our timer. As you can see in that eventhandler I also hide our login part.

image

Creating the User controls

So now let’s finally start and do something in the UI. We have our Page.xaml. Just add a StackPanel and name it Contacts . In this StackPanel we want to show our groups and contacts belonging to these groups. A way of doing this is creating 2 usercontrol. A GroupControl and a ContactControl.

In Part 4 in our userAgent class we created events we raise when we get  groupEvents and contactEvents. In the first event we get from our server we first get back the groups and then our contacts belonging to that groups. In the presenceEvent, which probably will be addressed in one of the next parts of this series, we get detailed information of these contacts and status information. For now we only get the sip uris and to which groups the contact belongs.

Let’s create our contactControl.

image

As you can see this is simple control. For the status indication I use an Ellipse with brush. I added a name attribute to the gradient stop color. This makes it easier to change the status color later on.

image

This control will be extended later with a private method, which changes the color depending on the availability of the user. If we do not have a display name yet we just show the sip address of the contact.
Create the GroupControl. Again with some sample xaml and the code belonging to that user control.

image

image

Adding event handlers.
Let’s get back to our main page. In one of the first parts we created the login boxes and a button to signin. After clicking that button we create an instance of our UserAgent, sign in and handle our events. As you see below the GroupEvent and ContactEvent.

image

GroupEvent
Let’s Handle our group events. For now I only handle the added action.

image

ContactEvent
Let’s Handle our contact events. For now I only handle the added action. As you can see I use an extra function to find the correct control.

image

image

Please note that this is a series how you can create a cwa silverlight application, not a complete sample yet. Next part of this series will show you how to handle presence events.

Any questions/ comments please free to contact us.
Sip:Marc.Wetters@e-office.com or email:Marc.Wetters@e-office.com or Sip:joachim.farla@e-office.com or email:Joachim.Farla@e-office.com.

Creating a CWA client with Silverlight 2 beta 1 (part 4)

In Part 3 we have seen how to setup our session. In this part we’re going to get the events from the server. In this case we are not going to use synchronous calls, but asynchronous calls. We do not want to block our UI thread.
Let’s get back to our UserAgent class and create our CheckEvents Method. If there is still a request to the server running, don’t create a new request. You get some internal error you can’t catch!!!
This has to be a public Method. I’ll explain in the next Part why. But First we have to create our data channel Url.

image

The datachannel url needs two parameters we have to provide.
Of course the Sid (the id of the session we created) and the AckID (acknowledge ID).
With the AckID we let the CWA server know which events we already got. If we don’t send the new acknowledge ID with our request, we get all events over and over again.
Next create our CkeckEvents method.

image

So we got our response. Let’s handle the response stream we got back.

image

First thing you see is that we get the ackID from the response. We’ll send it with the next request we make. Let’s process our ContactGroups.

image

Next is we have to create a user class and a group class so we can store our information. Then we have to create extra eventArgs so we can raise Events to our Silverlight application to handle them in our UI.

image

image

So we now we can handle some events. Next is how we can set a timer to get call the CheckEvents Method and do something in our Silverlight application to actually show we got something back.
We going to make a start with that in the next Part of this series.
Please note that this is a series how you can create a cwa silverlight application, not a complete sample yet.

Any questions/ comments please feel free to contact us.
Sip:Marc.Wetters@e-office.com or email:Marc.Wetters@e-office.com or Sip:Joachim.Farla@e-office.com or email:Joachim.Farla@e-office.com

Creating a CWA client with Silverlight 2 beta1 (part 3)

In Part 2 we created the logon request and send it. We got our CWA-ticket(authentication ticket) back. We will need this for all future request.
Now let’s do something with the response.

image

The method above will be used for all synchronous request. In this sample for logging in, creating a session. And for all commands we send to the cwa server.

When we login we get the Uri(our sip address) back belonging to the authentication information we used to login. And we get our signInData back. We need this for Initiating our session.
The other 2 things I handle in processing the response are the SID (session ID) we get that back from after initiating our session. And the PollWaitTime, this I will address in part 4.
Now we are authenticated next step is to set up a session.

image

This looks pretty the same as login in, but it uses a different request and a different url to send the request to. We need to add some code to the things we did in Part 2.
First the url we add to our UserAgent class.

image

Next is adding functionality to our Request builder. And to our constants.

image

So now we have setup our session. Next is to let our main application know that we successfully created the session. As you can see I raise an event in our UserAgent class. Our main Silverlight can handle that event. Hiding the login textboxes. Intializing our main UI.
What do we need for raising that event.

image

Now we have our session. We know how to send commands to the server. Next is checking for events from the server. Which we want to do asynchronously. That is going to be Part 4 of this series.

Any questions/ comments please feel free to contact us.
Sip:Marc.Wetters@e-office.com or email:Marc.Wetters@e-office.com or Sip:Joachim.Farla@e-office.com or email:Joachim.Farla@e-office.com

Creating a CWA client with Silverlight 2 beta1 (part 2)

In Part 1 we got started on building the CWA client. Overcoming some development problems. In this part we actually gone start developing.

image

Getting Started
First thing to do in your silverlight application is creating 3 textboxes in which you can enter your logon information. Best way is to put them in a grid so you can hide the grid after logging in. We are gone need username, domain and password.
The next thing we need is a new class file in my case UserAgent.cs. In this class we going to put all our CWA Ajax logic. As you can see all code is in C#.
First add some private and public properties we are going to need:
public class UserAgent
  image

Next step is the initializing of this class. As this application can only run on a cwa server we can get our server url dynamically.

      image

Logging in to the server.
Now it is starting to get interesting. Let’s create the login method on our class. After that we can call it from our silverlight application.
First create a new class for building the request.
image
Now we can build our request and start signing in.
image

As you can see we get our CWA-Ticket back. We going to need this for all future request we are going to make.
As this article has become a little larger as I initially planned, processing the response and initiating the session will be addressed in the next part of this series. Question of maybe feature requests please send us an email or contact us directly.
Marc Wetters and Joachim Farla
Sip:Marc.Wetters@e-office.com or sip:Joachim.Farla@e-office.com

Creating a CWA client with Silverlight 2 beta1 (part 1).

I was wondering if it was possible to create a silverlight application that would function as a CWA client. After some research, I found out that it can be done. In this series I will show you how it can be done and what problems I had to overcome to get it working.

Ideally, you would build a silverlight application that would run in any web application. At the moment this can’t be done.
Silverlight does support cross-domain access but only under certain circumstances:
•    only with http connections no https yet.
•    In root of the Target server there has to be a XML file that

allows silverlight to access that server from another domain(the CWA isapi catches all requests so that is a problem, you can create an extra isapi filter that only serves that xml file).
Therefore, building a Silverlight application and having the possibility to debug has to be done on a CWA server directly. Create a visual studio 2008 web application that actually runs directly on a CWA server.

image

After having overcome the problem of debugging, the next problem popped up: Authenticating.

Using the AJAX sdk there are several ways to authenticate (forms authentication, Integrated authentication). They all use a http-header(CWA-Ticket) after you have been authenticated.
After you logon to the server, you get your CWA-Ticket in the response headers, which you need for all further requests. Now we have a problem.

In silverlight the System.Net.HttpWebResponse doesn’t have any headers. How do we get that CWA-Ticket after logging in? We need that CWA-Ticket for all requests were going to make.
There is a solution for this problem, we have to use the browsers XMLHttpRequest object. I don’t wanted to use this object all the time. For now, I only get synchronous requests to work. So for commands and logging in I use the XMLHttpRequest for the asynchronous calls(asyncdatachannel) I use the System.Net.HttpWebRequest.

I know some people would say Silverlight does support Multithreading so that is not a problem. That is what I thought also. But actually the HttpWebRequest and XMLHttpRequest(ScribtObject) can only run in the UI thread. You do not want synchronous calls in your UI thread (it can block your client).

Here is a code sample to create the external XMLHttpRequest:

image

In part 2 I’m going to explain how to actually logon and initiate the session. Please contact Marc Wetters @
Sip:Marc.Wetters@e-office.com or send him an email on Marc.Wetters@e-office.com . Enjoy and please feel free to give us your feedback.

working at e-office